I’ve been interested in stitch-and-glue boat construction for some time. A few years ago, WoodenBoat published the plans for a CLC Kaholo 12’6” paddleboard in issues 229 and 230, and I thought this would be a great way to get started. I thought this would be a quick little project, and perfect to do at the Asylum because of our CNC cutting abilities. In the end it took me about a year off-and-on. I finally launched it at the beginning of August, and thought I’d record my thoughts on the whole process.
CAD and CNC
CLC sells both plans for those who want to cut parts out of plywood and kits cut on their own CNC router. I was excited to use our very own CNC router to do it, figuring that if I made the CNC files once then anyone else interested in the project would also be able to use them (paying CLC for the plans, of course).
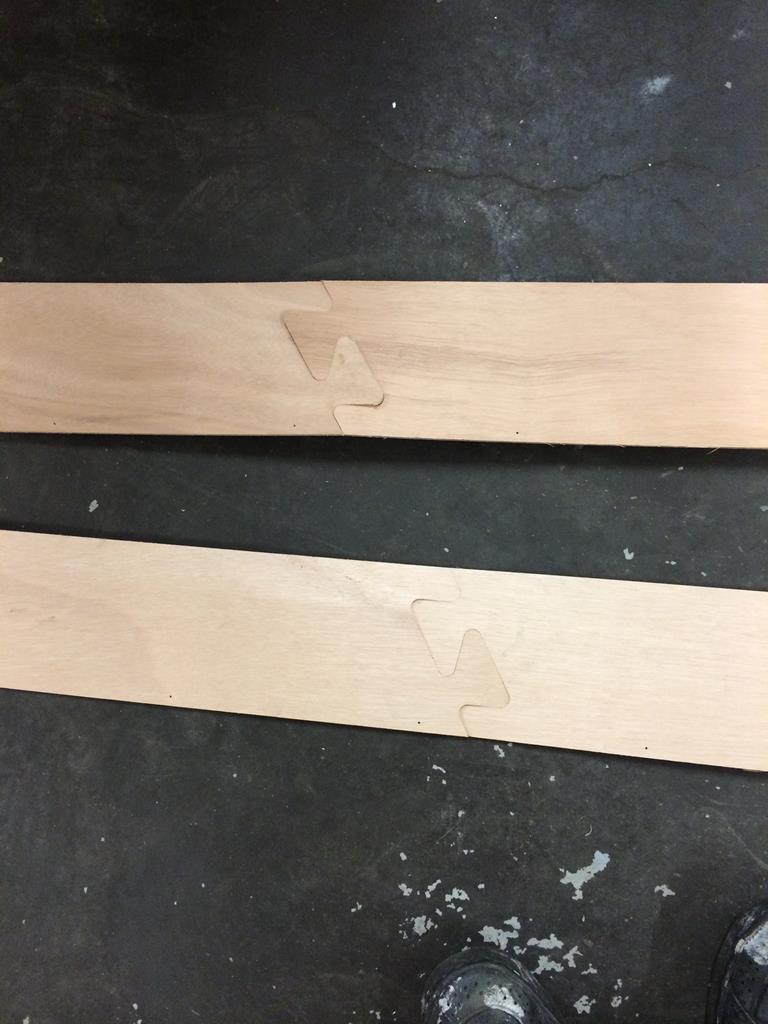
I used the dimensioned plans in the WoodenBoat article to make CAD models of the parts in Solidworks. Since the paddleboard is 12’6” long and the plywood sheets are only 8 feet long, a joint is needed in the middle of the top, sides, and bottom. Normally, plans builders are invited to scarf the panels together, whereas the manufactured kits use an interlocking “puzzle joint”. I figured that since I was doing my own CNC I should go with the puzzle joint which is just cooler. I looked at photos of the joint on the CLC website to try to recreate it.
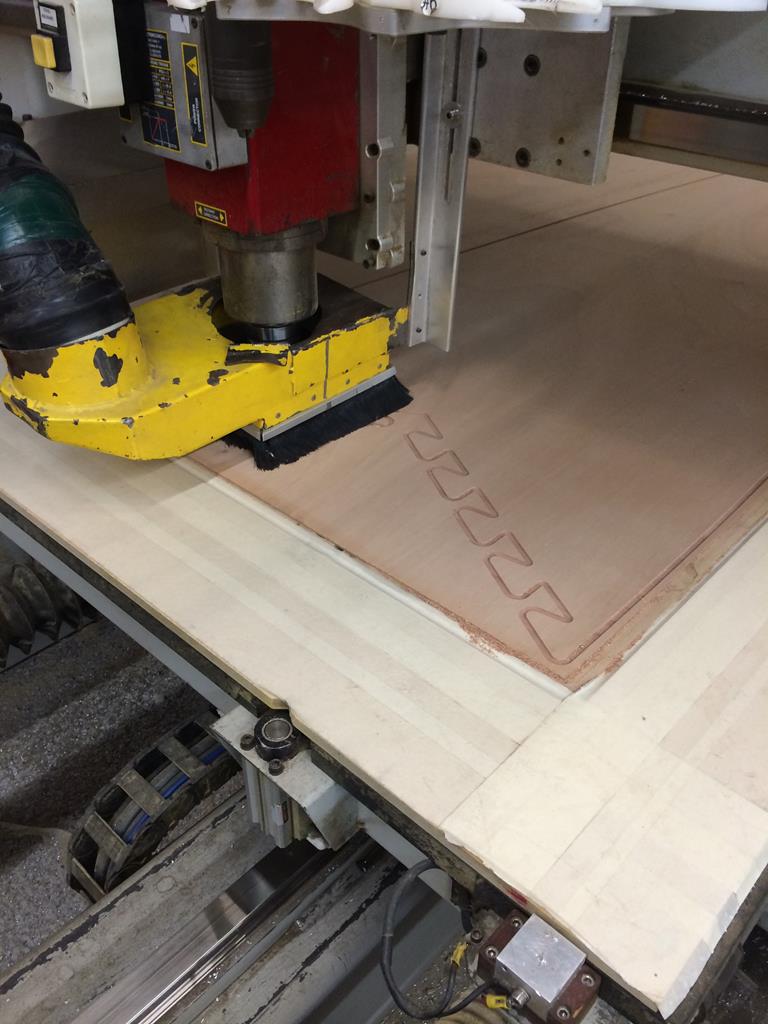
Once the models were complete I made the toolpaths in HSMWorks. I used a ¼” downcut cutter for most of the cutting, a 1/16” drill for the holes, and a 1/8” cutter for the stringer slots in the frames.
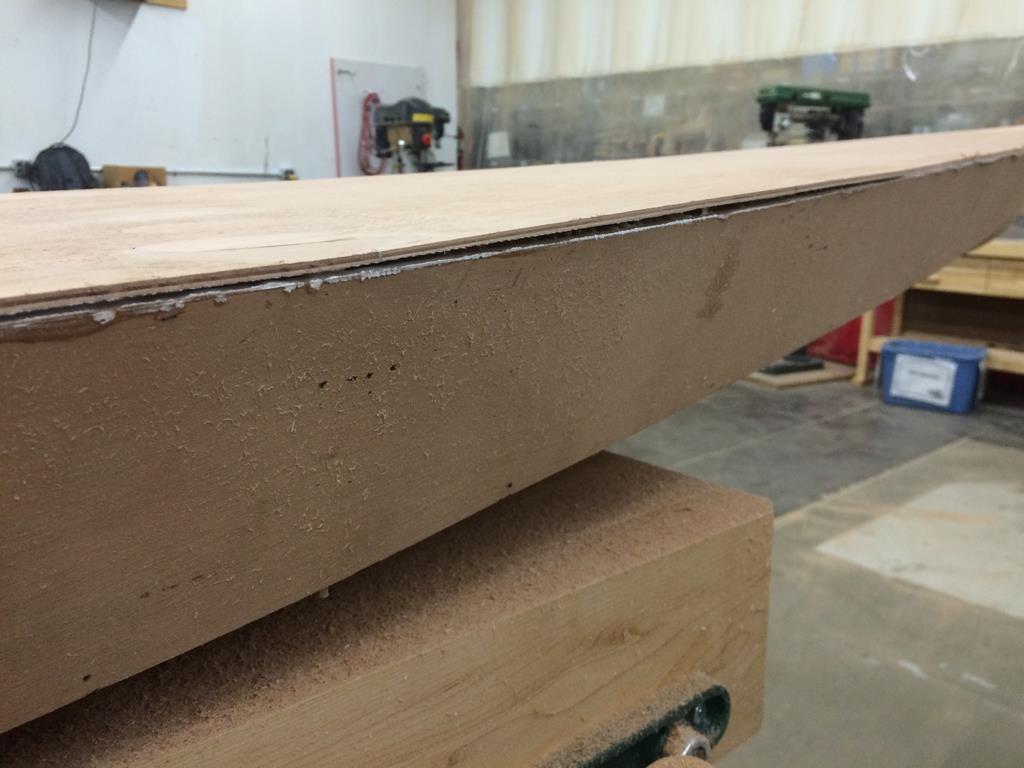
I ordered the marine ply from Boulter Plywood … and then it sat in my space for about a month. This was my first mistake. I stored it vertically and it warped in the summer heat and humidity. This wasn’t much of a problem for the cutting process since the vacuum table caused the sheets to flatten out. But the parts were warped in the end which made assembly a bit difficult. More on that later.
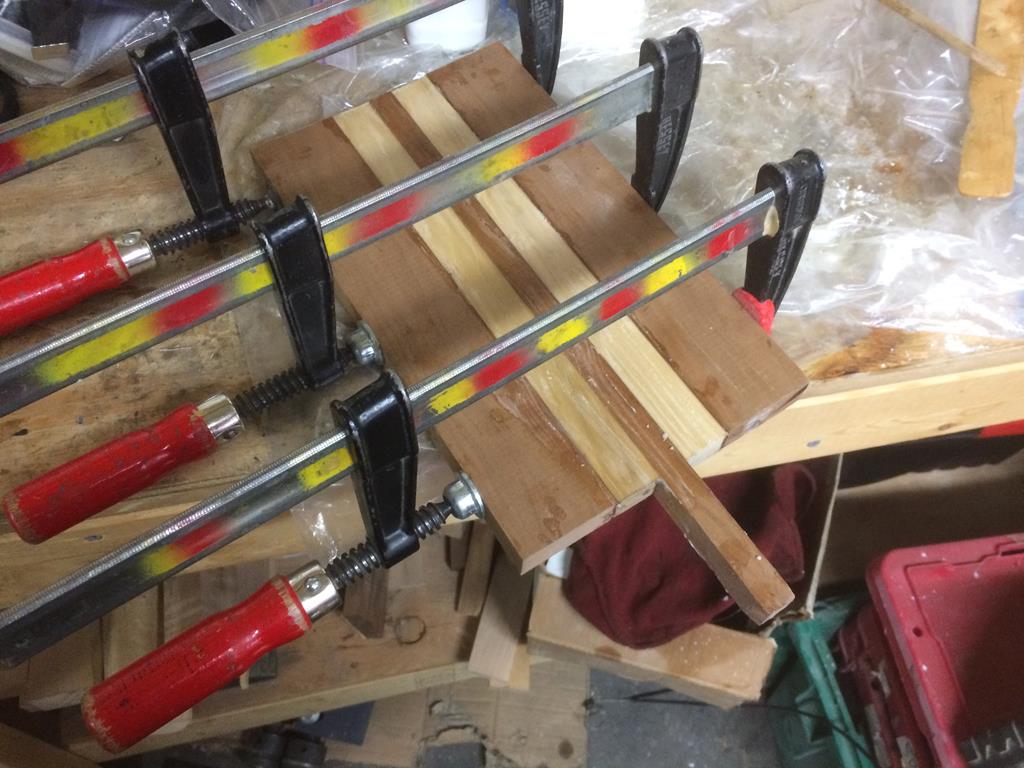
I started by cutting the top panels. This took 30 minutes on the MultiCAM and the puzzle joint fit together well which was encouraging. When held up to the light, I could see light shining through in places, but it was all filled with thickened epoxy anyway.


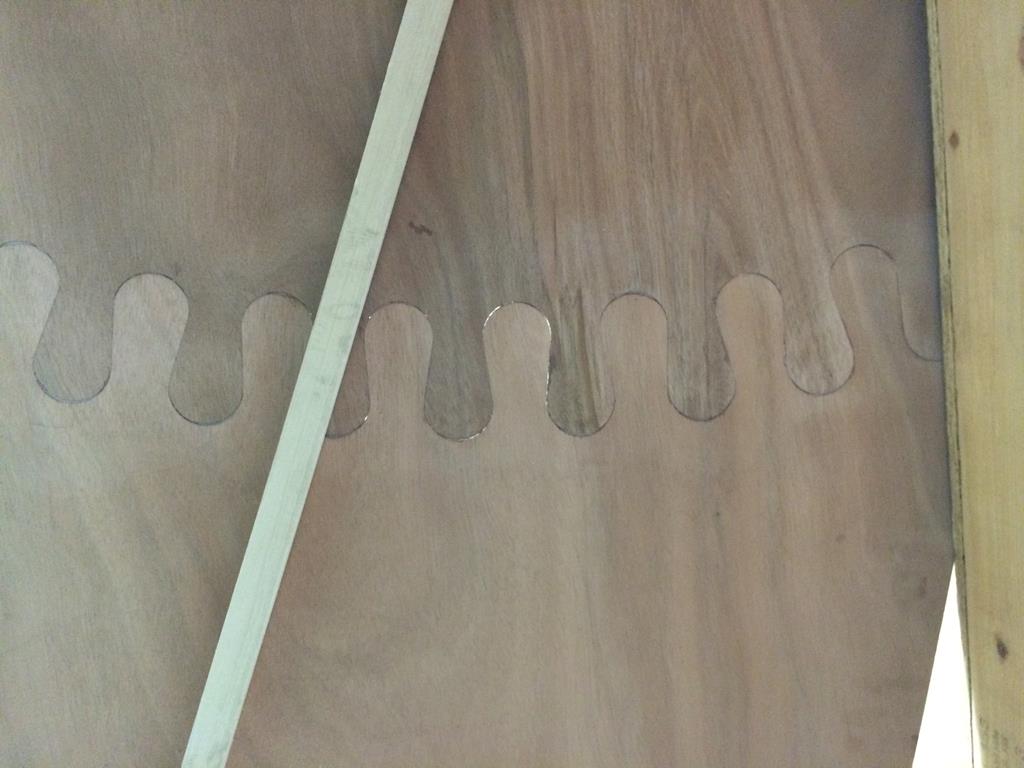
It took me 90 minutes to cut the two sheets containing the side and bottom panels due to difficulties setting the correct depth. However the puzzle joints on these also fit together well. The frames took me 60 minutes, and unfortunately the machine started cutting the outside profiles first, so the frames began to shift on the table and I had to stop the process and finish some of it by hand. After this I again left the parts sitting for a month while I worked on the stegosaurus costume.


Stitching and Gluing
When I finally got around to it, I epoxied the side panels and sheer clamps, the joints on the bottom panel, and then the top panel.
The top panel had a significant amount of warping in it, so I let it sit horizontally for a while and sprayed it with water in hopes of getting the bumps out. This would cause it to flatten temporarily but then it would bulge again when it dried. The time came to fiberglass the bottom side of the top panel, I covered it with a plastic sheet to protect it because we didn’t have curtains in the paint room at the time and weighed the panel down hoping that if it cures in a flat state, it will stay flat. This may have helped a little bit but not entirely. The surface of the fiberglass came out pretty ugly due to contact with the plastic sheet, but there was only one noticeable void which I sanded away. In short this is a what not to do, I don’t recommend any of what I did here.


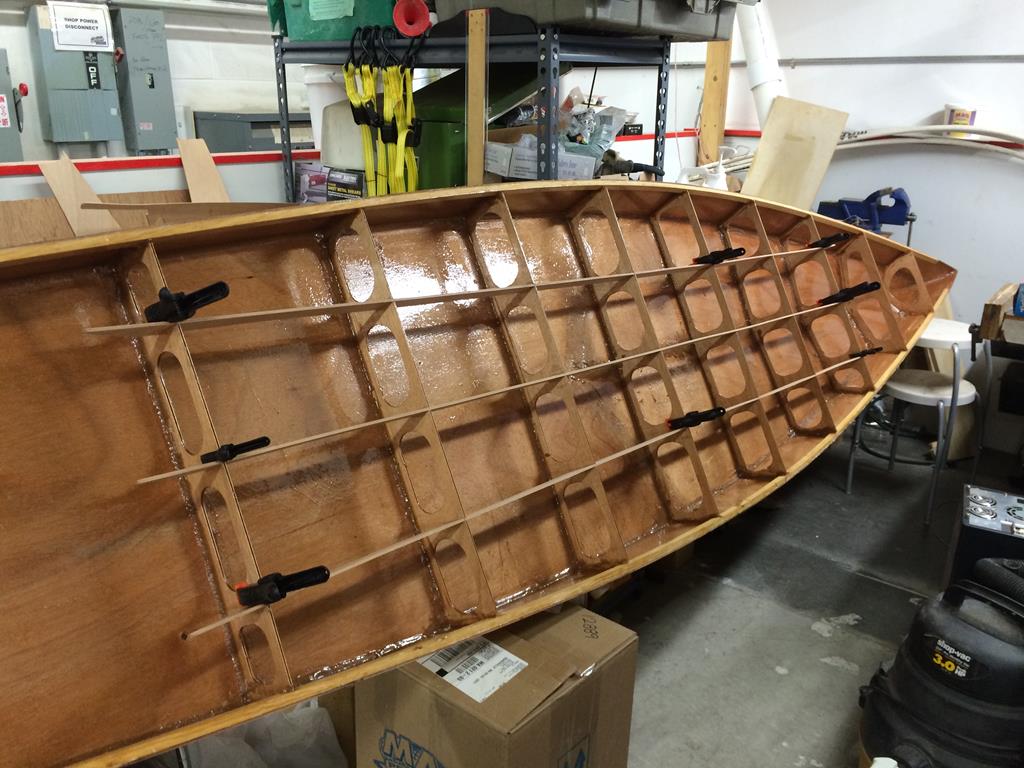
The stitching and gluing process was fairly straightforward, however, I found that the parts didn’t fit together perfectly. Whether this was because the dimensions given in the WoodenBoat plans were incorrect or some mistake on my part I don’t know. But I found that the bottom panel was several inches longer and wider than the sides when all was said and done. This wasn’t a disaster, I just had to trim things to match up. Another issue I had was that the holes I had specified in the CAD model didn’t always match up between the side and bottom panels so I had to drill new ones. I had to adjust the locations of the forward few frames relative to he plans to get the side panels to meet at the bow. Also, the bottom panel had a tendency to bulge out from the frames. So I added a few extra stitches to pull the frames and the bottom together tightly. I also had to use quite a bit more stitches near the bow than were called for in the plans.


The instructions talked about making a custom built-up tailblock out of cedar strips but I decided that I would paint the sides and back so I made it out of two 3mm plywood pieces glued together. Confusingly, the plans shown in WoodenBoat called for a transom piece made out of 4mm plywood with cutouts for the sheer clamps. This didn’t seem to fit so I ended up throwing it away.
The process of stitching, tacking, filleting, and coating the inside with epoxy, installing stringers and the noseblock only took around 20 hours – probably the most straighforward part of the project.


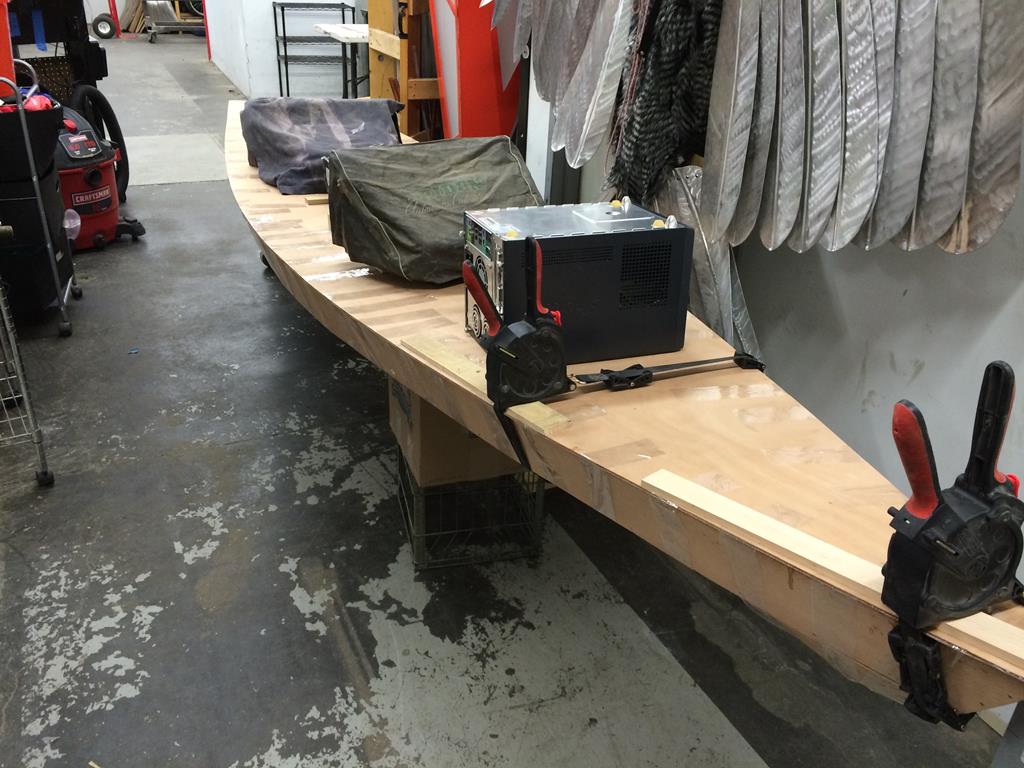
Once that was finished the next step was to flatten the top of the hull in the left-right direction so that the top can be attached. I went to the Tool Shed in Waltham and picked up a decent Millers Falls block plane and Stanley spokeshave for $15 each. I had heard about this place for years and figured it was about time I paid them a visit. There wasn’t exactly a great selection of these types of tools but I got what I needed and spent that afternoon doing the ritual flattening and sharpening of the blades.
By the way I should mention that I also used this project as an excuse to buy my first two pieces of Festool equipment, a Rotex RO90 sander and the Mini dust extractor. I found the pair on Craigslist for $600 in almost new condition and thought this was a lucky find. They would have been around $900 new. I did not include this cost in the total cost of the project. I found the experience of using them as pleasant as can be expected given the nature of the task. The dust extractor really is very effective at almost eliminating the dust, and the sander is quite ergonomic and has very little vibration. I think that trying to do the sanding I did without a dust extractor would have been far more unpleasant.
The flattening process took a few hours, and by the end I was using the block plane almost exclusively because the spokeshave had a tendency to dig down and take off too much material. I found that especially on the stringers it was very easy to make a deep gouge that would negate the purpose of the stringer which was to provide extra support for the deck. The intersections between the frames and stringers could not be worked with the plane since no matter which way I tried to go, the blade would be moving perpendicular to one of the plywood pieces and cause chipping. So I used my orbital sander to sand down those areas, and used the plane in between.


It came time to attach the top panel. This was probably my least favorite part of the process since I had to put on the panel and then tape and weigh it down as quickly as I could. Because the panel still had significant warping and bulges in it, I was not able to get it to lie flat uniformly on the whole board. I used a router to trim the excess as suggested in the manual, then used the block plane to get the edges perfectly flush. There were a few places where the panel bulged significantly at the edge and had large gaps – these I filled with more thickened epoxy.


Once that was set, I used a combination of sanding block and block plane to round the edges of the paddleboard. I wanted to go for a more angular appearance than in some of the pictures I’ve seen and so did the minimum amount of rounding I thought I’d be able to get away with when it came time to fiberglass.


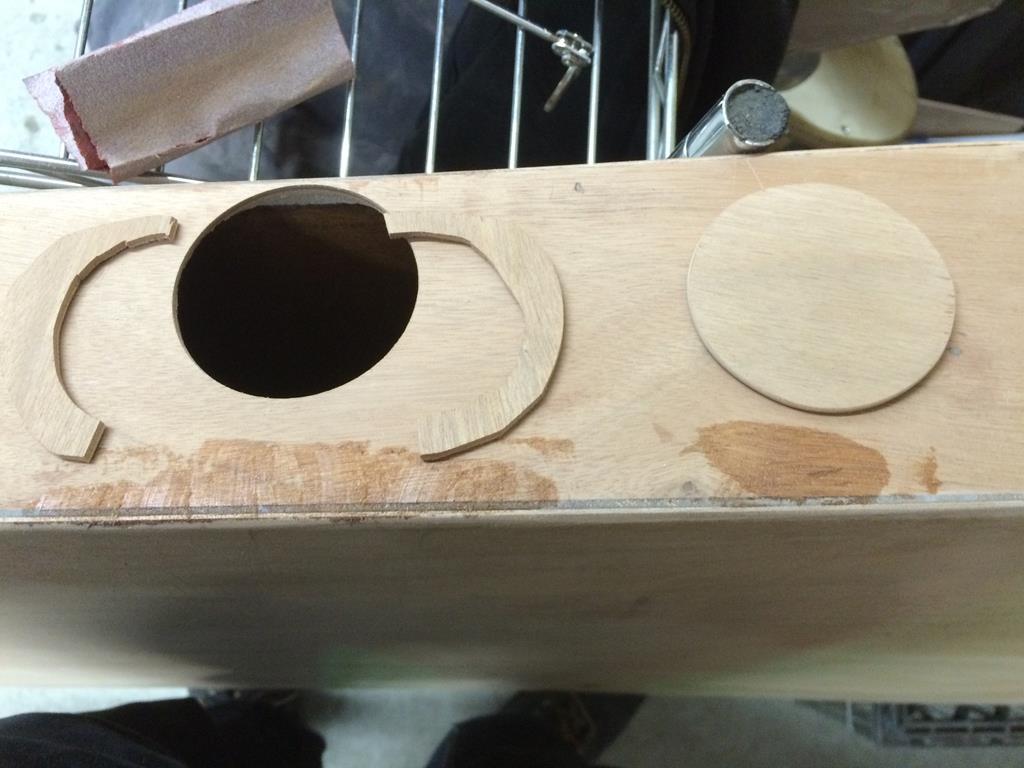
At this point I had to fill any remaining holes and gaps with wood flour-epoxy mixture and sand the board before covering it in fiberglass. The board had become difficult to move around because there was no longer any place to grip it, and at one point while moving it I dropped it on the corner of a milk crate. The next time I saw that I had broken a hole in the side. I used a hole saw to cut around the damaged area, made a flange that I epoxied in on the inside, and then epoxied in a patch disk. This gave me the opportunity to take a look on the inside to see how well the deck was actually lying on the frames and stringers. The answer as expected is better in some places than others. Anyway there was nothing I could do to improve it so I closed the board up and sanded the disk flush.


Fiberglass and deck fabric
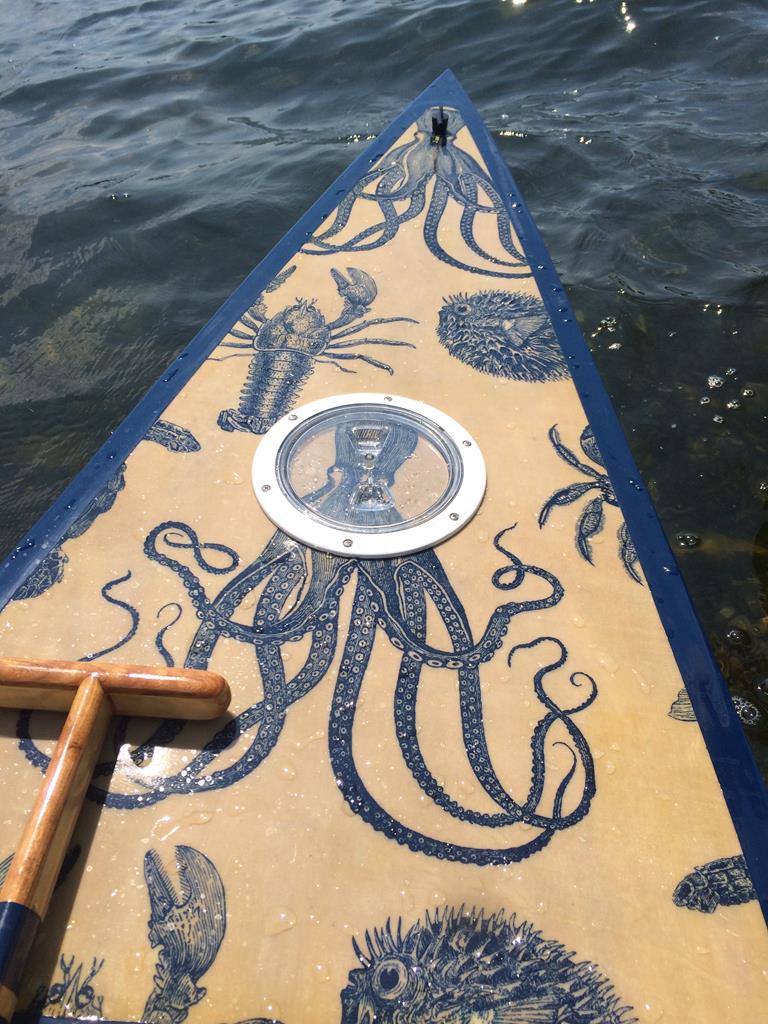
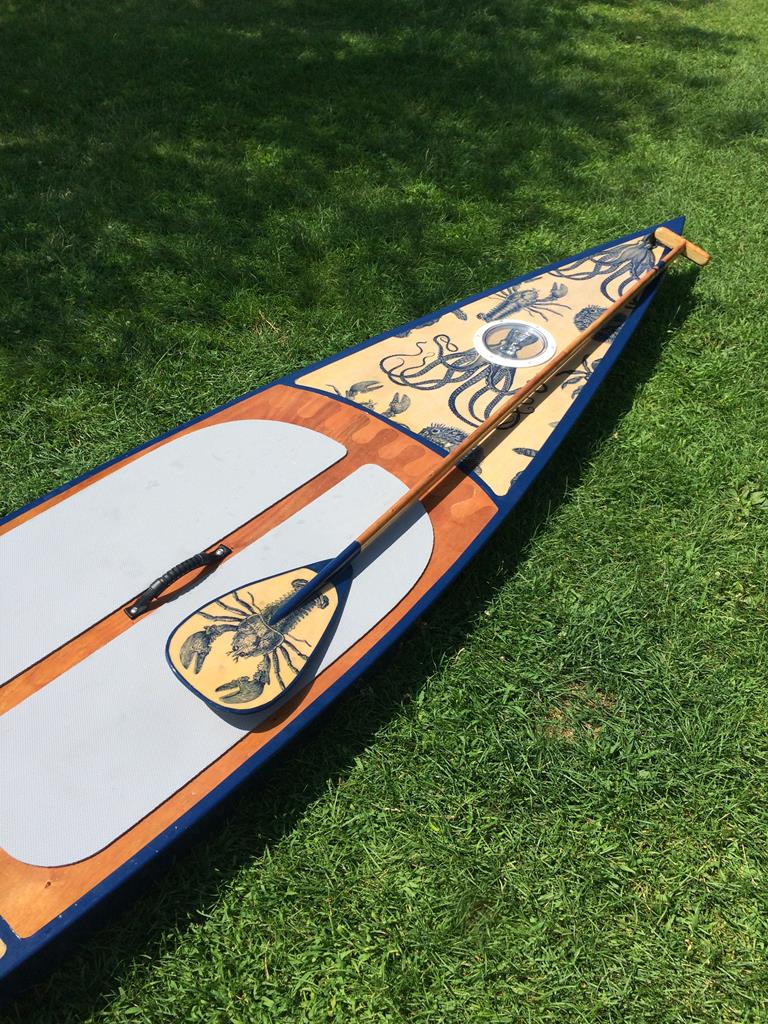
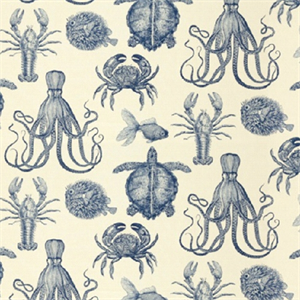
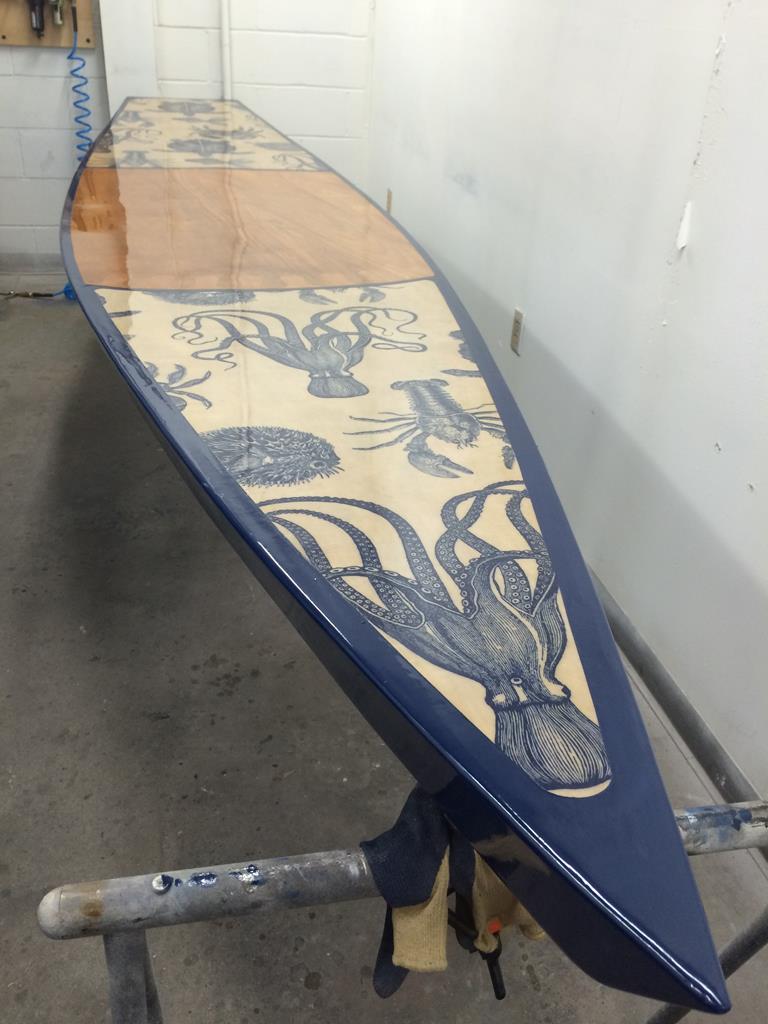
I got to this point at the end of January, when it still seemed like we might have a relatively mild winter, but then the February from hell happened, and March wasn’t much better. It was too cold in the paint room to do fiberglass so the project was on hold for a while. In the meantime I picked out the fabric – Oceanic Indigo by Duralee. I didn’t like the usual Hawaiian fabric suggestions, I was going for kind of an ocean-themed “blueprint” look, or perhaps a naturalist’s journal, a cabinet of curiosities.
It finally got warm enough toward the end of April. Fiberglassing the bottom was uneventful. I made the odd choice to fiberglass the transom as part of the bottom fiberglassing but this worked out ok in the end. The first two coats I used the plastic spreader, but on the last coat I decided to try using the roller. However I didn’t tip out the epoxy afterward because I didn’t know that I should so it ended up all bumpy which I regretted when it came to sand.
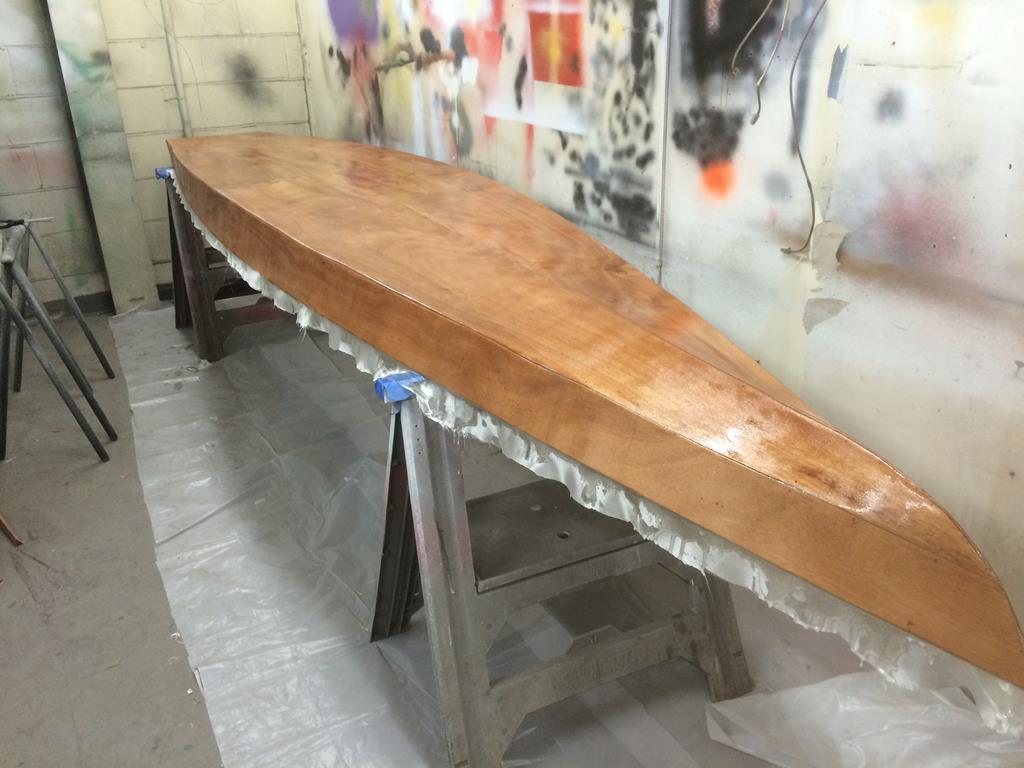
It was around this time that I became aware that I was running out of epoxy. I weighed the paddleboard and it was at 32 lbs. This was not encouraging since it’s supposed to weigh 29 when it’s finished and I hadn’t even fiberglassed the deck yet! I guess I must have used way too much epoxy on the inside… or something. In any case there was nothing to do but order more epoxy and press on.
In the next session I trimmed the fabric to shape and then epoxied the fabric and fiberglass to the top deck. The fabric absorbed an enormous amount of epoxy and it seemingly took forever to press all the bubbles out with the plastic spreader and get the fabric to lie flat. I had to put the fiberglass on right away before the epoxy set, so it took around 6 hours of uninterrupted work to get the deck covered, and since I was hurrying I didn’t make the edge very neat – just folded it over however it would go. I also regretted this when it came time to sand. There were a few small voids that I sanded and filled with epoxy.


Fins and Paddle
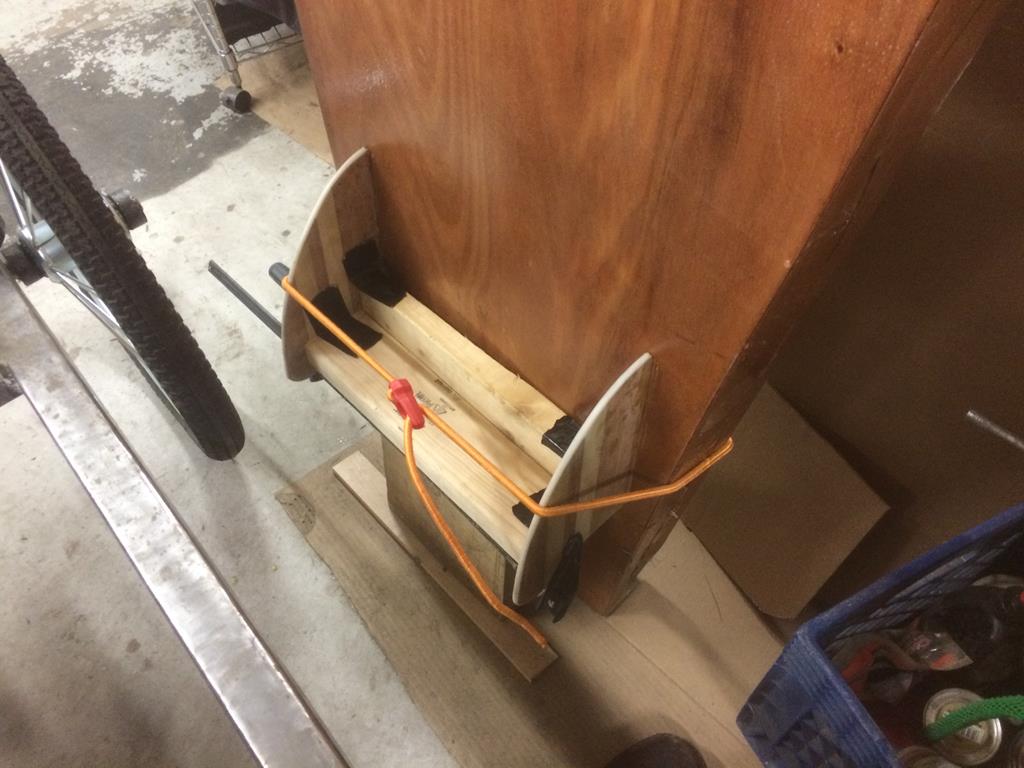
At this point, the paddleboard was essentially complete aside from the fins, additional coats of epoxy on all surfaces, and sanding. CLC sells fins, at this time they cost $68 apiece, which seemed excessive to me given that I have a whole woodshop at my disposal. I made my own by laminating some wide strips of what I believe were poplar and cherry. I resawed the lamination to produce two identical pieces, planed them, and so forth to produce the fins. I made a hard protective edge around the whole fin of Cell-o-Fill thickened epoxy, and then fiberglassed them. Then I attached them to the paddleboard’s bottom as per the instructions.


I was still somewhat unsure of how the finishing process would go, what the final layer of epoxy would be like, how much sanding was needed, how well my desired color scheme would work, etc. Since I also needed a paddle for my paddleboard I decided to build that first as a test before committing to my finishing scheme for the paddleboard itself. I built the paddle based on the directions on http://www.buildastanduppaddle.com/ with some modifications.
First, the instructions called for a round shaft with 1 1/8” diameter starting from 1-5/8” square stock. I didn’t have that readily available so I figured, why not make a handle with an oval cross section, wider in the direction that has to withstand more load? That way I could use a 1” square piece and two 1” x 3/8” pieces on the sides to make a sandwich. I used pine for the square part and cherry for the thinner pieces. Then I rounded the shaft more or less as instructed on the site, using a tablesaw set at an angle. I used the block plane to cut off the resulting corners, but unfortunately I was lazy and didn’t sharpen the plane beforehand. This resulted in tearout and general unevenness of the shaft – laziness and cutting corners were antithetical in this instance.
The second change is that instead of making a laminated paddle out of wood strips, I used a piece of plywood and covered it with lobsters cut out of the same fabric as I used on the deck of the paddleboard. This allowed the paddle to match the paddleboard. From there, I proceeded with the instructions as directed, coating the handle with epoxy, coating the paddle with fiberglass and epoxy, and sanding.


I used the Fineline masking tape from the CLC store for the paint, which works well as advertised. The blue of the paint ended up matching the color of the fabric almost perfectly which was nice. My design for the finish uses the paint to cover up the edges of the fabric instead of the automotive trim tape recommended in the building manual, which struck me as a cheesy approach to take. Although it doubles the time to do the finish this did not dissuade me at first though I realized the bargain I had made later.


Sanding and Finishing
While I was working on the paddle, I started sanding the sides of the paddleboard, which were a more uneven than the rest because of the overlapping fiberglass seam. Then I put a coat of epoxy on each of the sides. Then a coat on the deck and transom. Then a coat on the deck, transom, and sides. Then several sanding sessions with 120-grit sanding discs, followed by the final coat of epoxy on the deck, then the bottom fins and sides the next day. At one point, I dropped the paddleboard, creating a small dent in the bottom where the fiberglass delaminated. I sanded down to bare plywood, and put on a fresh patch of fiberglass and new epoxy.


After this I masked off the edges of the paddleboard to create my desired pattern, primed, and painted. One of the things I understood when doing the paddle is that even if I find any unevenness in the epoxy to be tolerable, it creates difficulties later when trying to sand the finish. This came up during the finishing process of the paddleboard as well. I mostly used a 2” foam brush to do all of the application. I tried to use the roller on one side but found the results to be inferior. Part of the problem was that the sides were slightly concave, a problem I encountered when sanding as well. This may have resulted from the fact that the wire stitches on the sides were in the middle. In either case I would recommend ensuring that the sides err on the convex side if they can’t be flat.


Sanding the paint and varnish was a tedious process since I couldn’t use the power sander on the fine trim areas. I did two coats of primer and three coats of paint. After that was all done I peeled off the masking tape and was quite happy with the result. Then I had three coats of varnish to do on the remaining areas of the board, sanding in between, using the 2” foam brush again. I read all of the instructions on the CLC website about applying varnish but found that I couldn’t avoid visible brush strokes entirely. I believe it may have had something to do with the heat in the paint room at the time – it was around 80 degrees. But I wasn’t willing to wait until fall to finish the project. I will add that I used 220 grit on the power sander for sanding in between varnish coats. It took about an hour each coat to sand the top and another hour for the bottom. I tried wet sanding but found it too messy and tedious.
Although the design of the finish is striking, it falls quite a bit short of perfection. However I don’t know if I could have done better without spending considerably more time on it. The areas along the fabric seams were particularly uneven. I also had a lot of trouble getting the joints between the fins and the paddleboard even and had to settle for good enough. Sanding through the fiberglass in very uneven areas was a concern. Perhaps a better course of action would have been to use filler in areas that would be painted over anyway.


Final preparations and launch
All that remained to do was a few final preparations: installing the breathing tube, deck plate, deck pads, and handle. I followed something I saw in the CLC forum and saved the deck plate cutout and glued it on the inside of the cover to avoid interrupting the fabric pattern. I used stainless steel screws for all of the hardware.
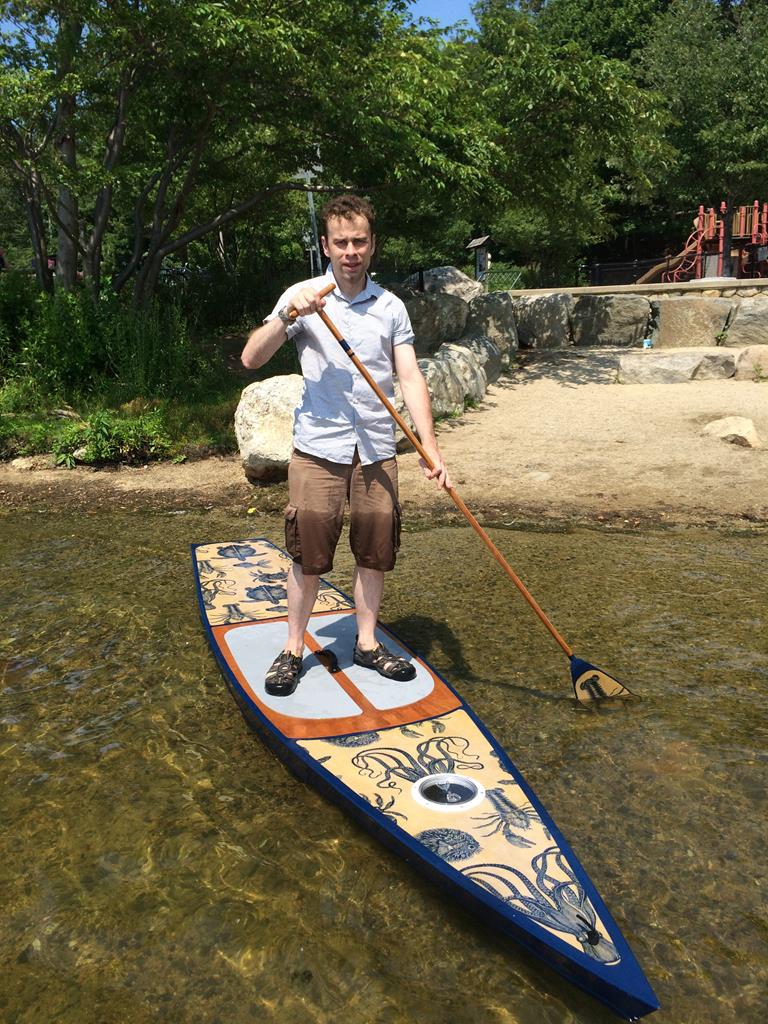
Then it was time to launch, fortunately I was able to find someone to assist me. On our way out of the building we weighed the paddleboard on the postal scale. The final weight was 40 lbs. Clearly this is far in excess of the 29 lbs specified on the CLC website. I have little to say for myself in this regard.


My estimate for the total time spent on the project was 150 hours (compared to the estimated 60 hours on the CLC website), and around $1500 in expenses.
I launched at Spy Pond in Arlington. The weather was not quite suitable, a passing rain shower, and too windy for comfort. I had never been on a paddleboard before, and was struck by the rate at which the wind would accelerate it and me through the water the moment I took my foot off the ground. This was mildly terrifying near the shore. I hope that I will develop more comfort with it over time, but I think the next water craft that I build will be of a more relaxing nature.
In any case I’m happy with the accomplishment such as it is and I hope anyone considering building one of these benefits from my experience. Onto the next project…